After some technical issues last week, here goes with the latest Bush Warriors Wildlife Photography Workshop.
Today we’ll be looking at white balance which, to many photographers, is one of the most difficult concepts to understand. Now, it’s all fine and well to go through all the technical details, but I believe it is way more important to understand how changing your white balance settings can influence your images.
Before we look at some examples, a quick look at what white balance actually is.
The short version is this: white balance is the process through which your camera ‘sees’ white under different lighting conditions. Think about it this way… If you were to take a piece of white paper and look at in bright sunlight, overcast conditions and under a fluorescent light you will perceive the piece of paper to still be white. Why? Because your brain knows that the paper is white and makes automatic adjustments to compensate for the different types of light.
Your camera is not capable of ‘thinking’ about the type of light you are shooting in and this is where setting your white balance can make a huge difference to your images. That being said, some of today’s cameras are getting quite good at measuring and determining light but it is still not as good as human eyes.
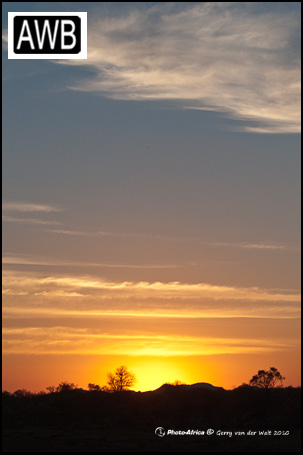
Some of the settings on your camera will warm an image up, or add orange tones, while other settings will cool an image down, or add blue tones. Check out these three examples where each image includes the symbol for the White Balance setting that was used.

This sunset was photographed on Auto White Balance (AWB). This is how the camera ‘sees’ the scene which, let’s be honest, is not too bad. The ‘AWB’ did quite a good job on this one.
If I wanted more oranges, and warm tones, in the scene I could set my White Balance to ‘Cloudy’. This will make the camera think that we are shooting in overcast light and it will increase the warmth and oranges in the images.

See the slight difference? The oranges are noticeably darker and more saturated leaving a more moody image.
On the other side of the scale, if I wanted to cool the image down by pushing my blues I could set my White Balance to ‘Tungsten’.

Huge difference! The camera now cooled the image down quite a bit leaving a very moody result.
By playing around with the above three settings you can create amazing sunsets and sunrises. Try these two scenarios which works wonderfully!
- When you are shooting the very last bit of orange light, set your White Balance to ‘Cloudy’ to give your oranges a little more punch.
- When you are shooting early morning, especially over water, set your White Balance to ‘Tungsten’ for a cool, early morning feel.
Now that’s all fine and well, but what about wildlife subjects? Can you use White Balance when photographing Africa’s large mammals?
Absolutely!
Check out the following example.

I photographed this male lion a few weeks ago. The sun had just dropped below the horizon which left the scene lacking contrast and color, and for this particular image my White Balance was set on ‘AWB’.
To warm this image up I could, and you have to try this as it works beautifully, set my White Balance to ‘Cloudy’ which will increase the oranges and warm tones in the image. For this example, I simply changed my White Balance to ‘Cloudy’ during post processing to show the result but changing your White Balance out in the field gives the exact same result!

Another huge difference! The camera added the warm, orange tones leaving quite a pleasing image.
Remember this tip: when you are looking at your subject through the viewfinder and the entire scene is in the shade, set your camera to ‘Cloudy’ White Balance to give the colors a bit of punch.
This is not cheating at all. You are simply using the tools at your disposal, your camera, to it’s fullest extent to create striking wildlife images. Photography is an art and the better you understand the technical side of your equipment, the better equipped you will be to create great images – no matter what light you are shooting in!
When you are next out in the field try playing with different White Balance settings. You will be amazed at some of the results. Once you have tried playing with your White Balance setting, remember to add some of your images to the Bush Warriors Photo of the Day Contest.
Have a great weekend!
Gerry van der Walt
![]()
![]()

![]()
tks for the tips….useful
Nice tips